Hi all,
Here we are going to learn how to install wordpress manually in cPanel, I’m going to post this article especially for new beginners in web hosting/cPanel
By following some simple steps you can install wordpress in few minutes
Requirements :
Before installing WordPress you need the below things
- You need cPanel access along with MySQL feature (If not you can buy hosting here )
- FTP login details along with any FTP client
All set …!!! Here we go …!!!!
# STEP 1 : Downloading WordPress Installation File
Before starting the installation we need to download the latest version WordPress from Official WordPress Website
Don’t know the Official WordPress download link, No problem Link is here
# STEP 2 : WordPress Installation File Upload
Once the WordPress downloaded we need to upload the file to our web hosting/cPanel
To upload the file you will have two options either you can upload via File manager feature in cPanel or you have an option to upload via FTP account using FTP clients (Filezilla, Core FTP, etc..,)
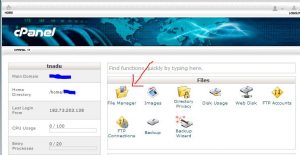
# STEP 2A : Uploading via cPanel File-manager
First of all you have to log on your cPanel , then go to file manager and then goto the public_html folder
Here you need to upload your WordPress file, Click the Upload option and then Click Browse and select the wordpress file downloaded on your computer

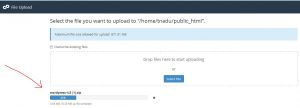
Once the file uploaded right click the file then click Extract option,
It will extract the files in the wordpress file(Recommended to delete the uploaded wordpress zip file from file manager)


# STEP 2B : Uploading via FTP
Initially connect your FTP account from anyone of the FTP client.
And then follow the same procedure which has explained earlier
# STEP 3 : Creating MySQL Database and user
Now we are going to create a MySQL database for our WordPress, To create MySQL database click MySQL database option in the cPanel and enter the details as mentioned in the pic. blow


Once MySQL database created then we need to create MySQL user for our database, To create a MySQL user enter the user name and its password (Remember this password) and then click Add

# STEP 4 : Assigning permissions to the MySQL user
We have created a MySQL database and MySQL user too, Now we need to assign previlege the MySQL user to access the MySQL database
For this find this option in the MySQL databases page “Add User To Database” Select the MySQL user and MySQL database which we have created previously and then click Add.

Now it will ask for user privileges, click the All Privileges and then click Make Changes option to save this setting

# STEP 4 : Renaming the Configuration file :
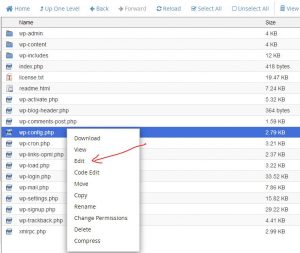
By default WordPress will comes with configuration file in the name of wp-config-sample.php
Now we need to rename this file as wp-config.php using rename feature in the cPanel

# STEP 5 : Editing the Configuration file :
Now we need to edit the wp-config.php file using Edit option in cPanel
Once the file has been opened in Editor mode replace the database name, user and password with our MySQL database and User details which we had created earlier

Once you entered the details Click Save Changes option in the Right hand side of the cPanel
# STEP 5 :Completing the Installation Setup
Now we have finished the all setup in the cPanel and now we need to complete installation by visiting installation path
http://example.com/wp-admin/install.php
Note : Replace the example.com with your domain name
Initial page will ask you to set the default language for your WordPress account.
In the next page you will asked to enter your site title and username and password
Hola…!!! Installation process was completed

Hope this was very useful for the beginners in web-hosting/cPanel, Share your valuable comments in the comments section