Hello All…..!!!!!
In this article I’m going to explain the step by step guidance to configure an email account using POP3 configuration
To keep your mails forever on you PC I’m highly recommending you to configure using POP3,
Because in POP3 Configuration mails will be downloaded to your PC and it won’t be removed from your PC even if your mail server losses the mails in at the time hardware/software crashes
So to safeguard your precious business related mails always configure your mail account using POP3
Nowadays lot of mail clients are available in the internet, some mail clients offers a free version and some of them will comes with an license to activate the mail client which you need to spend money

We are in familiar about MS OFFICE, In that bundle you can configure your mail account in the Outlook mail client
In this article I’m going to guide you the steps for configuring in Outlook 2013 which is having lot of features while comparing its parent versions MS Outlook 2008 and 2010
Now we can go-ahead and start the installation
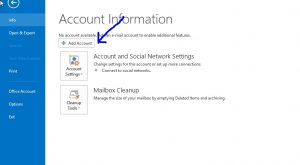
STEP 1 : Add a mail account
Open your outlook mail client and click on the file button in top left corner
There you can see an option called Add Account, Click that option.
STEP 2 : Account setup type
Now the new pop-up windows will open which will ask Automatic setup and Manual Setup
In automatic setup you need to enter your mail account username and password and then mail client will get mail server settings from the mail server automatically
But here I’m going to explain the steps for manual account configuration
So choose the manual setup option and then click next

STEP 3 : Selecting the mail service
Now the window will ask the type of mail service we wish to configure
As we are going to configure our own mail accounts choose the option as POP or IMAP

Hit the next button now
STEP 4: Mail account configuration settings

In the current window we need to fill the details of our mail accounts Enter your name and Email address in the User Information section
In Server Information section select the account type as POP3 and fill the incoming mail server and outgoing mail server based on your mail service provider
Now we need to enter our Email ID and its password in the Logon Information section
Also put tick mark in the Test Account Settings for this option Automatically test account settings when Next is clicked,
By enabling this option will help us to test our Incoming and Outgoing mail server settings at the time of clicking Next option in this window
STEP 5 : Configuring SMTP Authentication
In the current window click the More settings option and go-to the Outgoing Server tab
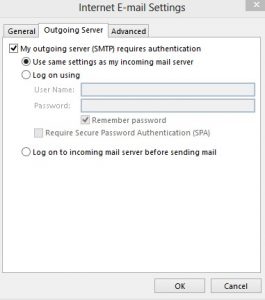
There enable the option mentioned as My outgoing server(SMTP) requires authentication
And then make sure the sub-option chosen as Use same settings as my incoming mail server
STEP 6 : Advanced Settings
Now go-to the advanced tab in the same more settings window
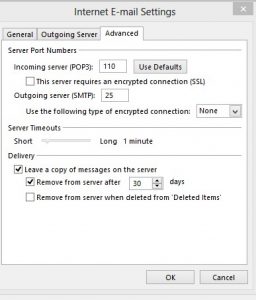
Server port numbers – In this section you have to update your PORT numbers based on the connection type such as SSL or Non-SSL based connection
(Not sure about the port numbers no issue..!! refer this article here)
By clicking use defaults option, Non-SSL ports will be updated automatically,
If you want to change you can update the PORTS here
Server timeouts – In this section you can set the server timeout based on your mail server
Delivery – In this section you can customize two things
- If you want to keep your mails in the mail server you need to enable this option – Leave a copy of messages in the mail server, by enabling this option you can store your mails in the server too. So the mail server will holds your mails upto the number of days which you have specified
- Remove from server when deleted from ‘Deleted Items’ – If you enable this option mails in the server will be removed at the time of deleting the mails on your mail client
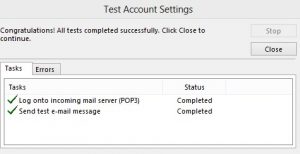
STEP 7 : Testing the mail configuration
Now all settings are completed, Finally we need to test our mail configuration,
As we enabled the Automatically test account settings option we don’t need to hit the test account settings option,
Close the more settings option by clicking Ok button and then click the next option
Now new pop-up will come and it will shows the result of mail server login and test mail status as below
Hope this article is much helpful to the new learners and I will see you on my next blog-post
Share your valuable comments in the comment box and Don’t forget to subscribe us on Facebook,Twitter and Google+
Nice article